Showing posts with label breakfast. Show all posts
Saturday, May 11, 2013
Cinnamon sugar biscotti
Every holiday season, there are the baked goods that I share and feed to others, and then there are the ones that I don't. Surely I can't be the only one who has less-successful baking ventures? My reasons for not sharing--whether at the work event where I make nibbly foods, or in the baking tins I share with family and friends--can be varied: it simply didn't turn out, or it didn't turn out as I had hoped... two very different things.
The biscotti I'm sharing today didn't make the cut for one simple reason, it's kind of plain looking. I know that might seem really discriminatory--poor biscotti can't help that it's rather monochromatic and beige, can it? But when I'm assembling holiday platters and goodie boxes, color and texture really DO matter. So this is one that I nibbled myself with coffee during the holidays, but didn't share further.
I made one large batch--probably quadrupled what you see below--and cut the first log into slices and continued baking. Once I saw the color and decided to keep moving along in terms of other baking, I took the remaining logs (uncut) and froze them. I do remember happily enjoying a few with morning coffee, back in December... but then promptly forgot about them in the new year.
Imagine my delight when I was rummaging around in the freezer this morning, looking for something, anything, to be a small sweet treat to accompany breakfast, and I saw these goodies? I'm really the only one in the household who likes to have something sweet to go with breakfast; both my guys are just fine with eggs, potatoes, maybe a little fruit and breakfast sausages or something, but neither of them have my same "Where's some jam on a scone?" "I need a cinnamon roll!" or "Just one bite of a blintz, please?" tendencies.
I took one biscotti log out of the freezer, defrosted it in the microwave and sliced it. I didn't run it back through the oven this morning, as I was quite happy with the flavor and texture as I dipped it in my coffee. But I do think it certainly would have more of an authentic biscotti texture if I did that in the future.
The flavor is quite a bit like cinnamon-sugar toast from childhood, and goes really well with coffee. What's not to love?!
Cinnamon sugar biscotti
2 cups all purpose flour
2 1/2 teaspoons ground cinnamon
1 teaspoon baking powder
1/4 teaspoon salt
1 cup plus 3 tablespoons sugar
6 tablespoons (3/4 stick) unsalted butter, room temperature
2 large eggs
1 large egg yolk
1 teaspoon vanilla extract
Preheat oven to 325°F. Line 2 large baking sheets with parchment paper. Mix flour, 1 1/2 teaspoons cinnamon, baking powder and salt in medium bowl to blend. Using electric mixer, beat 1 cup sugar and butter in large bowl until fluffy. Add 1 egg; beat well. Add egg yolk; beat well. Mix in vanilla, then dry ingredients.
Transfer dough to work surface. Divide in half. Shape each half into 9-inch-long, 1 1/2-inch-wide log. Transfer logs to baking sheets. Beat remaining egg in small bowl. Brush logs with egg. Bake until golden and firm to touch (dough will spread), about 50 minutes. Cool on baking sheets. Maintain oven temperature.
Mix 3 tablespoons sugar and 1 teaspoon cinnamon in small bowl to blend. Using serrated knife, cut logs into 1/2-inch-wide diagonal slices. Place biscotti, cut side down, on baking sheets. Sprinkle 1/4 teaspoon cinnamon sugar over each biscotti. Bake until pale golden, about 20 minutes. Cool on racks. (Can be made 1 week ahead. Store in airtight container.)
I believe I got the original idea from Pinterest, but when looking over the variety of recipes there and comparing to Epicurious, I went with the one on Epicurious. Simple, and delicious.
And, as I've already mentioned, it freezes well. Make a batch, and pull them out as needed for a weekend treat! I know I will be doing that again, soon.
Enjoy!
Tuesday, June 12, 2012
Green breakfast smoothie
nce upon a time, the breakfast smoothie/shake was a staple around our house. We enjoyed years of smoothies, really. But then, as with all tastes, you decide one day to try something different, mix it up a bit, and time goes by, new habits form, and before you know it, you can't remember the last time the Vitamixer was turned on!Well, not quite... we have still enjoyed the occasional fruit smoothie to accompany the weekend breakfast extravaganza, but our regular habit has long gone by the wayside. Husband enjoys his steel-cut oats, Seth his egg and English muffin combo, and me, I waffle between hot cereal, granola, yogurt and breakfast cookies. But, as I reflected recently on our bumper crop of strawberries, and the overflowing kale as well, I thought giving a green smoothie a try might be worthwhile.
And it was!
Green smoothie
Serves 1 (approx 400 calories, if you care about that kind of thing)
1 cup strawberries
2 handfuls chopped raw kale (approx 3 cups)
1/2 cup yogurt
1/3 cup oat bran
1 cup orange juice
Place the strawberries in the bottom of the blender, followed by the kale, yogurt, oat bran and orange juice. Start out low on the blender speed, increasing until it's on high and the smoothie has mixed to your desired consistency. I pureed it pretty fine for quite a while, unsure how I would like the raw kale in this form. (Salad is one thing, but drinking it is quite another.)
I liked it, I really liked it. (Cue Sally Field.) It was fresh and not too sweet, and while the kale was strong, it wasn't too strong. If one wanted to tone down the kale further, a banana might help, but I tend to think bananas take over everything else, and wanted to get some strawberry out of the drink... and it was there, subtle, but there.
I will definitely give this another go, and it just may become my summer standby, with the fruits varying with their availability.
Do you enjoy kale? Enough to give it a go in a smoothie? If you have any favorite smoothie recipes, please share--I've been collecting a bunch on Pinterest, and am always up for another!
Side kale note: If you have found the rampant proselytization of all things kale to be a bit over-the-top, you'll enjoy this article from Slate. I especially chortled around Day 6, of course!
Saturday, May 19, 2012
Breakfast options for the whole family!
eekend breakfasts are special occasions around here. Well, especially Saturday breakfasts... Sundays (other than in winter...) we tend to have more get-up-and-go to our mornings, whether it's to hit the yard or errands or just general chores.Omelets have been quite popular around here lately, and the lovely omelet pan I received for my most recent birthday has been put to good use, with great results. Omelet variations are easy to accommodate--husband has "the works" (which means all vegetables + light on cheddar cheese), I am *most* vegetables and a wider assortment of cheeses (my latest favorite is a white cheddar made from goat's milk), and Seth is a straight up peppers + cheddar. See, easy (once you get the hang of different bowls with different ingredients).
This morning we employed a further customization of breakfast items... And for all you mothers out there who will proclaim me a bad influence for making every person an item of their choosing, just remember: there are THREE of us. Not four, or five, or more. And I like doing this, so deal. It's how we roll.
Seth wandered through the kitchen as the hash browns were hitting the pan and mused about a pannekoek possibility. Pannekoek is a dish we had while visiting Grandma Kandt in Canada years ago (at a specific pannekoek restaurant), and was an immediate hit: a thick potato pancake with cheese (and meat if you're so inclined; the gevulde pannekoek, if you're into looking it up online, though the description of "Dutch meat-filled pancakes didn't really do it for me). Seth's long been a potato pancake fan, so the idea of cheese being an added ingredient? We'll let's just say he comes by the cheese love honestly!
In another pan, husband's omelet came together nicely...
And in yet another pan, I decided to stray from my original plan to mimic an Israeli egg dish I pinned just yesterday, shakshuka--eggs cooked in a spicy tomato sauce. I took one look at all the glorious asparagus and couldn't help but deviate in that direction. And, I was feeling less saucy, so it really strayed more toward a vegetable hash with eggs.
We enjoyed a lovely morning family interlude, enhanced by warmed sticky buns and fresh squeezed orange juice.
Pannekoek a la Seth
2 cups hash browns, uncooked
2 eggs
1 cup diced sweet peppers (we had red, green, orange and yellow on hand; precooked in the microwave, 2 minutes)
1/4 cup flour
1/2 cup grated cheese
2 Tbsp. jarred queso (special request this morning by the teen boy, completely optional)
Salt and pepper to taste
Mix all ingredients together in a medium mixing bowl.
Heat a medium frying pan (an omelet pan works nicely) over medium-high heat and spray with a little non-stick spray. Add the potato mixture all at once and spread out to cover the whole pan.
Let the mixture cook, until lifting the edge slightly, you can see that the bottom is crisping up nicely--about 5-6 minutes depending on the heat. Using a pancake flipper, loosen the whole pannekoek and slide onto a plate, then flip the whole thing back into the pan, uncooked side down. This is not nearly as acrobatic as it sounds. If you use a medium-size pan, you can put it on top of the plate and, using hot pads, flip the plate and pan over that way.
However you do it, return the pan to heat for another 5-6 minutes, and then slide out onto a clean plate and serve. We've sliced a larger pannekoek up between several eaters in the past... today it was all for Seth!
Sher's "shakshuka"
1/2 cup peppers, sliced thinly
1/4 cup finely chopped green onions
1 cup thinly sliced asparagus spears
2/3 cup halved grape tomatoes
2 eggs
Heat a saute pan over medium heat with a scant drizzle of olive oil. Add the peppers and onions and saute for a minute or two. Add the asparagus and continue to saute, followed a minute later with the tomatoes.
When the vegetables have wilted a bit, create a couple of holes in the vegetables where you can see the bottom of the pan and crack an egg into each hole. Turn the heat down to low and cover the pan until the eggs have cooked to your desired consistency. Put a cover on the pan to get the egg whites cooked properly before the vegetables have turned to mush.
This was very yummy and springtime fresh!
I hope your weekend breakfasts are as yummy as ours... What's your favorite breakfast special?
Labels:
breakfast,
eggs,
potato pancakes,
recipes
Tuesday, February 21, 2012
Starting the day out right: Breakfast cookies
ears back, in the catering days, I made breakfast cookies a LOT. First for my own consumption, and then for my personal chef delivery clients. The cookies were quite popular, and then for some reason, post-catering, I just stopped making them. I fear the original cookie from in the day will never be reproduced... but what I came up with might be even better! Really. I used the original recipe from my previous experimentation for inspiration, but my notes are lacking. (I know, you're shocked. Me too.)
But, not to be deterred, I went with a bit of memory, a bit of what was currently in the cupboard. Three adaptations later (husband and I liked all three versions), we decided this is the one we like best.
Breakfast cookie
1 cup brown sugar
2 cups oats
2 cups whole wheat flour
3 Tbsp. chia seeds (or ground flax meal)
2/3 cup oat bran
1 tsp. baking soda
1 tsp. baking powder
1 tsp. salt
1/3 cup almond butter (could use peanut butter, easily)
1/3 cup canola oil
1 cup applesauce
1/3 cup water
2 eggs
1 1/2 tsp. vanilla
1 cup dried cranberries
1 cup toasted walnuts (or hazelnuts, or any nut, really), chopped roughly
Preheat oven to 350 degrees. Grease cookie sheets or line with parchment.
In a large bowl, stir together all dry ingredient, including the cranberries and nuts; create a well in the center. In a smaller bowl, mix together the wet ingredients. You may need to warm the applesauce and almond butter together to make the butter smooth enough to mix easily. Pour all wet ingredients into the well. Mix well.
Scoop cookies using an large spoon or ice cream scoop, making the size that you prefer. I have always wanted a large breakfast cookie look and feel, so I go big (or go home, right?). One recipe makes 12 4-inch cookies, and the recipe doubles well, too.
Bake for 10 minutes for smaller cookies, 15-17 for larger cookies. Make sure to pull when they are still somewhat underbaked, so that they are soft and cakey. Cool on wire racks.
These cookies freeze well, and for those mornings when getting out of the house in a hurry is important, they are fabulous for on-the-go eating.
Enjoy and happy breakfasting! I'm looking forward to having one with my coffee tomorrow.
Monday, April 25, 2011
Easter brunch: Apple cake, or shall we have rhubarb?
his apple cake has a long, long history in our family. I can't remember when it was first discovered in an old family favorite cookbook, An Apple A Day, but I've made it more times over the decades than I can count.With family headed into town this weekend, it seemed only right (well, and Shelby made mention of it...) to bust out an apple cake move or two... so Sunday morning for Easter brunch we did just that! And of course, just to mix things up, I made a rhubarb one as well, with a little different make-up: fruit on the bottom. Clever, that. And yummy too.
The original, though I went a little light on the apples. There's nowhere near 2 cups here...
sorry, Shelby!
sorry, Shelby!
Rhubarb variation: delicious and definitely a make-again!
The batter is adapted from the original sufficiently to have its own name!
Brunch fruit cake
1.5 cups flour
1 tsp. baking powder
1/2 tsp. baking soda
3/4 cup sugar
1/2 cup quick rolled oats
1 tsp. cinnamon
1/2 cup melted cinnamon
1 egg
1/2 cup milk
2 cups apple, thinly sliced, or another fruit of your choice...
Combine the dry ingredients, mix well. Add butter, egg and milk, beat well. Pour into a greased 8-inch square baking pan; stand apple slices in batter.
Topping
1/4 cup sugar
1/4 cup quick oats
3/4 tsp. cinnamon
Combine and sprinkle over top of the batter.
Bake in a 375 degree oven for 30 minutes, or until a skewer inserted in the middle of the cake comes out clean.
Rhubarb variation: Wash and chop 3 cups rhubarb (about a half dozen stalks). Toss with 1 Tbsp. lemon juice and and 2/3 cup sugar. Put in the bottom of an 8-inch pan and spread the batter over the top. If desired, spread the topping over the batter and bake as directed above.
After a brunch of baked eggs, tater tots, cake(s), fruit and juice, it was time for a little egg hunting. Happily, a new-ish brood of bunnies was out in the yard, and welcomed us before scampering off to their safe zone (the junipers).
Here is Lucy, sneaking up on a wee baby bunny.
Maizy with her loot, and a little gray bunny from Aunty Sher.
There was quite a bit of happy cousin time on the trampoline.
Right now the girls are dominating, with grins!
And then there was bouncing, lots of bouncing.
It was a lovely family weekend, with lots of sunshine, a pleasant walk through the Whitman Mission (in sunshine, no less!) more than a couple of naps, some rolicking Tudors time (for the adult ladies, late into the night), and even a little sunshine for the egg hunting... Thanks for making the trek over, Goerlitz Jrs., we enjoyed our time with you immensely.
Labels:
apple cake,
breakfast,
brunch,
eggs,
rhubarb
Saturday, February 26, 2011
Cracking the poached egg, finally
poached egg has long been my favorite way to eat a breakfast egg. Fried is too greasy (most days); scrambled is good at home, but if you're eating out prepare to eat rubber. Same goes for omelettes... add in overcooked veggies and it can really be a mess. But the thing about the home-poached egg is those whites. What to do about those stringy and roaming-about-the-pot whites? There's advice to add an acid (small amount of vinegar or lemon juice) to the water, but I've had little success with that really helping. And those poaching pods are a nice attempt, but really don't quite do the egg justice. (The whites can still get either rubbery or not completely set up, and I'm not fond of the perfectly round look when it slides out--almost seems unnatural. I know, picky picky.).
Just this morning, early early, I was reading and saw a post from Michael Ruhlman linked to by Jason Kottke. (Have to give credit for the find--if you don't know kottke.org, you really should. He scours the web so you don't have to, and presents a number of interesting tidbits every day ranging from technology to popular culture. Definitely one to add to the feeds.)
Anyway, back to Mr. Ruhlman. (Here's his post.) The upshot is that he's produced a slotted spoon that, if you crack an egg into it, will eliminate that part of the white that is watery, leaving "good" white behind with the yolk, which will make for better, easier poaching. My initial thought was, yeah, right. I have spoons like that (by Martha Stewart) in my drawer already, what would be special about his spoon, given that it is $27? So upon truly rising a couple of hours later, I decided poached eggs would have to be on the menu this morning.
So Ruhlman's idea is spot on, happily. Eliminating that watery part of the white makes for a much more beautiful and less far-flung (his word is flyaway, I like it) poached egg. And, in the process I did discover that Martha's spoon is too small to really hold the yolk and "good" white; the first egg I cracked into her spoon slid right off and into the small bowl I had positioned beneath the spoon (thankfully). I made do with a larger food-service slotted spoon from the catering days, and it did the trick nicely.
I had some leftover black bean and corn salad in the fridge and warmed the mixture up before putting the poached eggs on top. Seth had been adamant that he wasn't hungry-hungry and was going to have a bowl of cereal... until he saw my creation. So I surrendered the first bowl quite graciously and continued with my egg experimentation.The next bowl turned out just as lovely, and a new poached egg tradition has been solidified for me. I am thankful that I have my big slotted spoon, as I wasn't really in the mood to shell out for Ruhlman's special spoon, and I have a feeling that if you have a bigger-than-normal slotted spoon around, it would work for you too!
Happy breakfasting!
Labels:
breakfast,
eggs,
poached eggs
Monday, December 13, 2010
Cranberry pecan streusel muffins
irthday season has continued (does it ever end? I think not!) and recently I was in need of a sweet treat to take along to a friend's birthday celebration. It was a morning coffee-come-and-go type of affair, so I pondered outside the cupcake realm a bit, and also wanted to get into the holiday swing of things with some cranberries... what better than a cranberry muffin with streusel on top?Found this little gem at epicurious, and whipped them up in a flash! Yummy and quick, I did make a couple of adjustments based on what I had on hand, as well as personal taste. Definitely a make-again muffin, and worth experimenting in a loaf style as well.
Cranberry pecan streusel muffins
Makes 12 muffins
Topping
2 tablespoons all-purpose flour
2 tablespoons granulated sugar
Pinch of salt
1/4 teaspoon ground cinnamon
1 tablespoon unsalted butter, cut up
1/4 cup (1 ounce) pecans or walnuts, finely chopped (I used a combination of those nuts and included pistachios as well... love that hint of green!)
Muffins
1/2 cup granulated sugar
1 cup cranberries, coarsely chopped
1/2 cup (2 ounces) pecans or walnuts, chopped (same nut combo as above)
1 teaspoon grated orange zest
1 teaspoon orange extract
1 large egg at room temperature
1 cup plain or orange yogurt, top liquid poured off
4 tablespoons (1/4 cup) unsalted butter, melted, or canola oil
2 tablespoons wheat germ (I substituted oat bran... just not wild about wheat germ flavor)
1 1/2 cups unsifted all-purpose flour
2 teaspoons baking powder
1/2 teaspoon baking soda, if using (I did)
1/2 teaspoon salt
1/2 teaspoon cinnamon
Coat the muffin cups with nonstick vegetable spray (then wipe the top of the pan with a paper towel) or coat with solid shortening. Preheat oven to 400°F.
In a medium bowl, toss together all streusel topping ingredients and pinch everything together with your fingertips to make crumbs. Set aside.
Measure the sugar. In another bowl, toss together the cranberries and nuts with the grated orange zest, extract, and 1 tablespoon of sugar. Set aside.
In a large bowl, whisk together the egg(s), yogurt or milk, melted butter or oil, the remaining sugar, and the
Divide the batter evenly among the muffin cups, filling them nearly full. Sprinkle generously with the streusel crumbs. Bake 20 to 22 minutes, or until the muffins are golden brown and well risen and a cake tester inserted in the center comes out clean. Cool slightly on a wire rack, and serve warm.
I made a double batch, so there was ample for the birthday girl and friends, and plenty for home as well. In fact, I froze a few and have taken them out and defrosted as needed... still quite tasty. I would say the only downside to defrosting is the streusel gets a little gooey. But, hey, a little sweet gooeyness every now and again? Not so bad...
Labels:
breakfast,
cranberries,
muffins
Saturday, November 13, 2010
Pumpkin muffins
oke up with a persistent craving for something freshly baked for breakfast and knew that I had some leftover pumpkin in the fridge... naturally, I reached for my handy epicurious app on the iPad and pretty much picked the first one that popped up. Luckily, it was a yummy option--but I find that it's hard to go wrong with the epicurious folks...Pumpkin muffins
Makes 12
1/3 cup golden raisins
2 cups all-purpose flour
2 teaspoon baking powder
1/4 teaspoon baking soda
1 teaspoon ground cinnamon
3/4 teaspoon ground ginger
1/8 teaspoon ground allspice
1/8 teaspoon ground cloves
1/2 teaspoon salt
1 stick unsalted butter, melted and cooled
3/4 cup packed light brown sugar
3/4 cup canned pure pumpkin
1/4 cup well-shaken buttermilk
2 large eggs
1 teaspoon pure vanilla extract
3 tablespoon raw green (hulled) pumpkin seeds (pepitas), divided
Preheat oven to 400°F with rack in middle. Butter muffin pan if not nonstick.
Soak raisins in hot water 5 minutes, then drain.
Meanwhile, whisk together flour, baking powder, baking soda, spices, and salt in a large bowl.
In a separate bowl, whisk together butter, brown sugar, pumpkin, buttermilk, eggs, and vanilla. Add to dry ingredients and stir until just combined, then stir in raisins and 2 tablespoons pumpkin seeds.
Divide batter among muffin cups and sprinkle with remaining seeds. Bake until a wooden pick comes out clean, about 20 minutes. Cool slightly on a rack.
I made some adjustments: no raisins for me, no thanks. And I also omitted the pumpkin seeds and substituted whole wheat flour for the all-purpose. While I enjoyed my muffin (with coffee, of course) quite a bit, they lacked a little bit of a pumpkin "punch"--a little milder in flavor than I was hoping for. Some fiddling around with the amount of pumpkin in the future may possibly help... I'll keep you posted.
Warm from the oven, these made a delicious addition to our omelette and potatoes breakfast! And undoubtedly contributed to the must-nap-after-breakfast feeling I had to fight... well, maybe fight is too strong of a word. The nap and I chatted for a bit and I gave in pretty quickly...
Tuesday, April 27, 2010
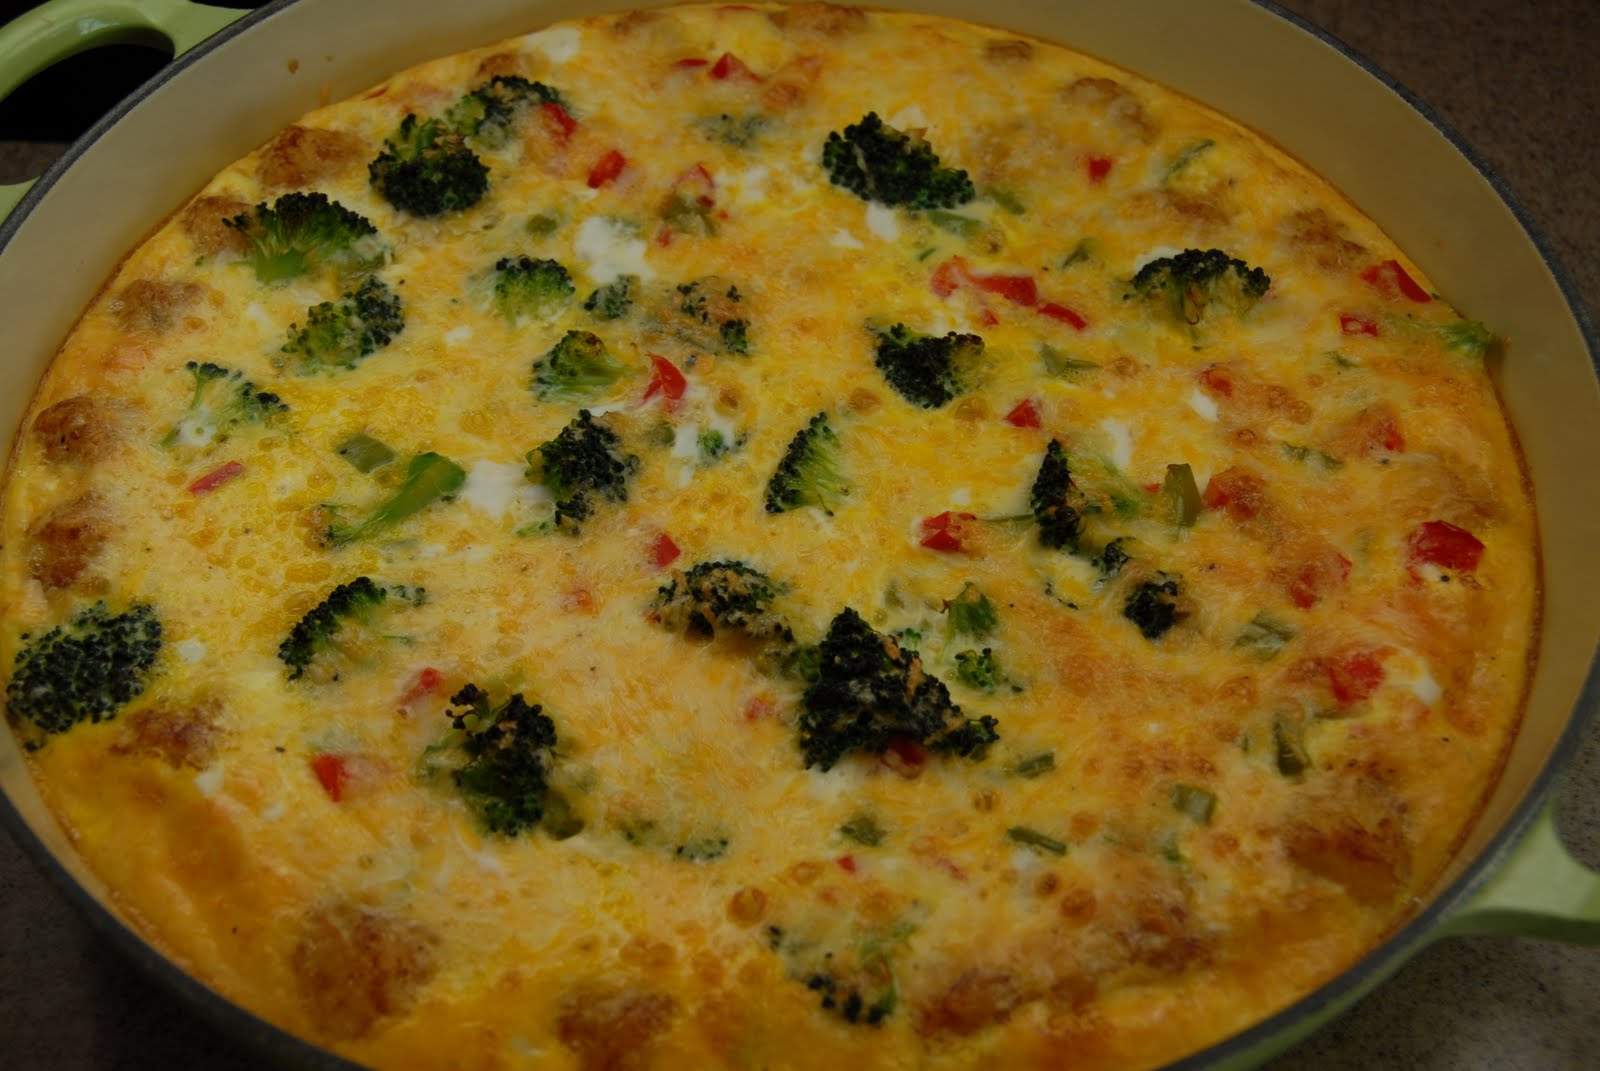
Very bodacious frittata
ear friend Jen posted something on Facebook a few months back about a frittata that she makes, a recipe she got from a friend. When she called it a "bodacious frittata," I knew I'd have to give it a spin and begged the recipe from her. With my tendency toward adapting, I had to mix it up a bit, of course, and now the fritatta, while still resembling the one Jen told me about, is an animal all it's own. And it's a yummy, oh-so-easy animal, too!First go-around, close to the original.
Take two, a step further away from the original.
Original Bodacious Frittata
Use a 3" deep pan
Fill bottom w/ tater tots
Cut turkey sausage into chunks; sprinkle all over
Layer w/ sliced mushrooms
Layer of mozzarella cheese
1 dozen eggs, whipped w/ milk, salt and pepper, pour on top
Cover with foil
Bake at 325 or 350 for about 1.5 hours, remove foil last 20 minutes or so to brown.
Bodacious Frittata, adapted
Tater tots, one bag, enough to cover the bottom of the pan, baked
Vegetables, 3 cups, chopped and steamed
Baked eggs mixture (a combination of cheese, cottage cheese and eggs, with a roux to thicken)
Using a 9 x 13 baking pan, layer the tater tots on the bottom. Cook the tater tots until crispy and done. Remove from the oven.
Meanwhile, take 3 cups of the vegetables of your choice--I have used asparagus, peppers and broccoli--and steam them. The microwave works very well for this, or you could pan saute them too. Regardless, get them cooked a bit. Al dente is nice, as they'll continue to cook in the frittata.
Layer the vegetables over the tater tots and pour the egg mixture over the top. Jiggle the pan a bit to get the egg-cheesiness to really settle in to the tater tots and put back in the oven at 350 for 45-50 minutes. Cover with foil at the end if it's getting a little too golden.
This is probably the fourth batch of frittata I've made in a month, and this morning I made it for about 100 people at work. It was the best iteration yet, I think; I've been nibbling on leftovers all day. You can see my half-eaten plate above, quick-snapped from my iPhone... I wasn't awake enough to remember to take a pretty picture of the whole pan, but at least this way you get to see the layers.
This is definitely a make-often brunch staple. Thanks for sending me down the tater-tot road, Jen. It's changed how I think of frittatas, forever!
Tuesday, April 20, 2010
Best banana bread. EVER.
have made banana bread for years, and generally the same recipe too... a very serviceable set of ingredients as laid out by Fanny Farmer. And then I started to experiment a bit, with almond flour. I really enjoyed that first loaf, which split the almonds and wheat flour about 50/50.But the bold statement laid out in the headline above was made possible by the desire to go even further down the path toward gluten free... I swear you will have no idea this bread is gluten free. It doesn't have the heaviness and chewiness that I often associate with gluten-free baked goods. It's moist and yummy and full of banana goodness, without being overwhelmed by the nuts.
Best banana bread
4 ripe bananas
3 eggs
1 tsp vanilla
2 cups of ground almonds (run blanched almonds in the food processor until they are truly mealy)
1 cup Namaste muffin mix (pretty widely available in the baking section at grocery stores these days)
1 tsp baking soda
1 tsp baking powder
Preheat oven until 350 degrees.
In a large bowl, mash the bananas and add the eggs and vanilla. Mix up the dry ingredients and add all at once to the wet. Stir until well mixed. Pour into a bread loaf pan and bake for 45-50 minutes, until a knife or wooden skewer inserted in the loaf comes out clean. Let cool in the pan for 10-15 minutes, then invert loaf out of pan and cool completely on a baking rack.
I wasn't prepared for how much I enjoyed this bread! It's really moist (I already said that, didn't I?), which is what I like in banana breads--some of which taste more like banana cake--I have when out and about at Starbucks, on the ferry to Mayne Island, etc. But the nutritional value of those breads tend to leave a lot to be desired. While the fat content is pretty high due to the nuts, it's important for me to remember that it's the good fat, right?
Off to have another slice with my coffee...
Sunday, January 24, 2010
Hollandaise delight
ow do you know it's Sunday morning at our house? The kitchen is a mess. Joyous, happy, massive mess. There's a potato pancake in one pan for the young man, omelette in another pan for husband, and me nibbling from both pans... but this morning I was in the mood for something eggy (*shock*) and rich (*doubleshock*) and realized I hadn't had a bit o' hollandaise in a long time.My challenge (besides wrapping my brain around THAT. MUCH. BUTTER.) was finding a recipe that suited my lazy mood. Not in the frame of mind for standing over a double-boiler with a whisk, let's just say. I have seen various blender hollandaise recipes, so decided to investigate and experiment! And, I also wanted to make a small serving--no "well, I have a cup of sauce so I must eat a cup of sauce and promptly nap" nonsense today.
One quick caveat: If you're going to make a small quantity of sauce, you'll need a blender that has a blade right at the bottom of the blender jar. I first thought I'd use our VitaMixer, which has such a great and powerful motor that I could only imagine heavenly hollandaise from it. But, the blade is raised from the bottom at least a half-inch, so the egg yolks just sat happily while the blades whizzed crazily above them. So I transferred to a smaller old blender with a low-down blade and it worked very well.
Hollandaise for one
2 egg yolks
1 Tbsp. lemon juice
dash salt
dash cayenne
1/4 cup melted butter
Put the yolks, lemon juice, salt and cayenne in the blender jar. Heat butter until melted and bubbly but not browning. I did this in the microwave. Be sure to cover your butter so that there isn't giant explosions in your microwave, fyi. Whiz the yolk mixture for 20-30 seconds until frothy; then slowly pour the butter in a steady stream through the top of the blender (take out center of lid but keep the outer edge on so that you don't have extreme splatter). Keep whizzing for another 30 seconds to a minute, until the sauce thickens.
Pour this delectable mixture over whatever strikes your fancy. Today my eggs sat on a bed of sauteed spinach with a few avocado slices on top, with the bright and happy sauce over the whole lot. It was heavenly.
Labels:
breakfast,
eggs,
hollandaise,
recipes
Friday, December 25, 2009
Christmas breakfast cheese blintz puff
I can't remember the first time we made this fabulous but easy breakfast casserole... I think it was sometime in the '90s. The recipe is from the Moosewood book Sundays at Moosewood, which is one of my old favorites. Every time I open it, I am reminded that I should browse it more often! This has been a family Christmas breakfast standby more Christmases than not, and I had almost forgotten about it when Ma mentioned making it yesterday! Yeah for her memory, not so much for mine...
This happy and sunny Christmas morning we made a half-recipe. Having only four adults to partake, a 9x13 pan seemed like a bit of overkill. And the recipe halved quite nicely.
Here is the full recipe, as written in Moosewood:
Easy Cheese Blintz Puff
Batter
4 large eggs
1 1/4 cups milk
2 Tbsp sour cream or plain yogurt
1/4 cup melted butter
3/4 tsp vanilla
1 1/3 cups flour
1 Tbsp sugar
1 1/4 Tbsp baking powder
Filling
about 1 pound farmer cheese
1 pound ricotta cheese
2 large eggs
2 Tbsp sugar
2 Tbsp fresh lemon juice
Toppings
Sour cream
Berries
Applesauce
Preheat the oven to 350 degrees.
In a blender, combine the batter ingredients until very smooth. Pour half of the batter into a buttered 9x13 pan. Bake for about 10 minutes or until set.
Meanwhile, combine the filling ingredients and mix well.
When the bottom layer of batter has set, remove the baking pan from the oven and smoothly spread the cheese filling over it. Briefly remix the remaining batter and then gently pour it over the filling, covering it completely. Return the pan to the oven and continue to bake for 45 to 50 minutes or until the top is puffed, set and browned.
Remove from the oven and allow to rest for 10 minutes before cutting it into squares. Serve immediately--either plain or with toppings.
It makes for a lovely breakfast, one I highly recommend for you and yours! We opened stockings before we ate, of course, and now the turkey's (this one Ma has named Annabelle, mine from Thanksgiving was Harold, just a bit of info for you there) in the oven and we'll get started on the rest of Christmas dinner a bit later. It's a beautiful morning on Mayne Island and hardly feels like Christmas at all, but every time I suggest a bit of snow, I get booed down by the rest of the room. Sigh.
Merry Christmas to all from our peaceful island hideaway!
Labels:
breakfast,
cheese,
cheese blintz,
recipes
Saturday, September 26, 2009
No-bake granola bars
With husband gone on business, my morning routine fell to shambles almost immediately. Breakfast smoothie, what breakfast smoothie? That's completely UNindicative of how much I dearly adore our smoothie... but it's hard to make just for one and I really shouldn't drink the WHOLE thing.
Frankly, cereal doesn't excite me much any more. I did a couple of days of cereal and yogurt and one morning I had with oatmeal and apples. But I knew something with a bit more heft (and something yummy with my coffee) would help see me through my busy mornings. I had some almost-made granola in the freezer (all the dry ingredients mixed together) but hadn't gotten around to making it, because every time I make granola I seem to mess it up and wasn't in the mood for messed up granola. So I landed on the idea of granola bars.
Granola bars! I do love homemade ones, usually, and have a real freaky addiction to those granola chunks that Costco sells in their bakery section (which are also not so healthy...) so I thought I'd make up a pan to see me through the coming week. And maybe, just maybe, Seth would like them too...
I went straight to the Bittman, but was disappointed that his recipe called for using already-made granola and basically wetting it to make bars. Turns out a lot of online granola bar recipes start out with granola... who knew? Not for me. But luckily a few other food blogger types had figured that out and wanted a recipe that really is From Scratch, so I was able to cobble together a workable solution from a few of their successes.
I made a big-ole pan, but have scaled back the recipe to fit a 9x9 pan for normal people. I think I will be a freezin' some of mine that don't get eaten this week.
No-bake granola bars
2 cups rolled oats
1/4 cup ground flax seed
1/4 cup sunflower seeds
1/2 cup grated coconut
2/3 cup chopped nuts--I used a combination of almonds, walnuts and cashews
1/2 cup honey
1/2 cup oil--I used canola
1/2 cup peanut butter
1 tsp vanilla
Preheat oven to 350. No, this is not for baking the granola bars. This is for toasting the dry ingredients. Mix all the dry ingredients in a bowl. Pour onto a baking sheet and toast in the oven for 10-15 minutes, until the toasted oat smell starts to waft through the house. Take out of the oven and let cool. Pour back into mixing bowl.
Mix the honey and oil together in a small saucepan and bring just to a boil over medium high heat. Take off the heat and stir in the peanut butter and vanilla. Pour wet mixture over the dry and mix well. Line your 9x9 pan with plastic wrap--so much easier to get the bars out later--and put the granola mixture into the pan, pressing down hard on the surface; I wet my fingers a bit as I was doing this so they wouldn't stick.
Cool for a bit, then cut into bars. Finish cooling in the refrigerator until bars are hard. Store them in a airtight containter in the fridge.
I just finished my breakfast of granola bars, a honey crisp apple and coffee. Ah, let the weekend begin!
Labels:
breakfast,
granola bars,
recipes
Monday, May 4, 2009
Seth's Home Ec success!
Oh boy, does this bring back memories! Seth is currently in his six-week Home Ec rotation, and the benefits are immediately evident. Saturday morning he wanted to make the cinnamon treats the kids made in class last week, as well as a version of the Orange Julius too. (He is so my kid--he makes "versions" of things, even when he doesn't have all the ingredients. This will bite him in the butt sometime, but still, it's a great quality to have in the kitchen. That's my story and I'm sticking to it.)
I swear we made something very similar in Home Economics when I was in grade seven or so--cinnamon biscuity things. I think we called them "cinnamon rolls" but they didn't much resemble for me the heavenly yeasty things my Grandma Kandt made. Similarly, Seth called these cinnamon "pull-aparts," but in my book that usually implies a yeast dough. So, obviously no one trusts adolescents with yeast... not surprising. I trust very few adults with yeast. Just saying.
Seth's Cinnamon Pull Aparts
Biscuit dough
1/3 cup brown sugar
3 T butter
1 Tbsp cinnamon*
1/2 tsp water
In class they used a tube of Pillsbury biscuit dough. We did one better (sort of) here at home and used the lower-fat Bisquick mix.
Make up the biscuit dough, or undo the can--I do like that "poof" sound! Break off 2 inch balls of dough and roll them into rough biscuit shapes.
Preheat the oven to 400 degrees F. Put the brown sugar and butter in an 8-inch baking dish, and warm in the oven until the butter is melted. Stir the brown sugar and butter together, add the cinnamon and water and mix thoroughly.
Take the biscuit shapes and roll them around in the brown sugar and butter, making sure to cover all sides, until you have rolled all of them.
Bake for 10 minutes. This is a very specific instruction. Apparently when I said, "Just bake them until they're sort of golden and look done," this was deemed inappropriate kitchen activity (don't worry, I'll wear him down on this one too...). Thus the timer was set, they were pulled out at 10 minutes precisely, and they were yummy!
The orange-banana-julius-like smoothies were also quite lovely. It was a happy breakfast.
(*Many thanks to Grandma for the question, upon reading: "Now, do you put cinnamon in this?" Good question, Grandma! We missed that in the original posting.)
Seth's Cinnamon Pull Aparts
Biscuit dough
1/3 cup brown sugar
3 T butter
1 Tbsp cinnamon*
1/2 tsp water
In class they used a tube of Pillsbury biscuit dough. We did one better (sort of) here at home and used the lower-fat Bisquick mix.
Make up the biscuit dough, or undo the can--I do like that "poof" sound! Break off 2 inch balls of dough and roll them into rough biscuit shapes.
Preheat the oven to 400 degrees F. Put the brown sugar and butter in an 8-inch baking dish, and warm in the oven until the butter is melted. Stir the brown sugar and butter together, add the cinnamon and water and mix thoroughly.
Take the biscuit shapes and roll them around in the brown sugar and butter, making sure to cover all sides, until you have rolled all of them.
Bake for 10 minutes. This is a very specific instruction. Apparently when I said, "Just bake them until they're sort of golden and look done," this was deemed inappropriate kitchen activity (don't worry, I'll wear him down on this one too...). Thus the timer was set, they were pulled out at 10 minutes precisely, and they were yummy!
(*Many thanks to Grandma for the question, upon reading: "Now, do you put cinnamon in this?" Good question, Grandma! We missed that in the original posting.)
Sunday, April 12, 2009
Brunchiness
Anticipating a busy Sunday (yard! house! work!), we moved our Easter brunchiness one day earlier this year. I made the family favorite baked eggs, with hash browns and a fruit salad. There were the assorted breakfast "meats" as well, and french toast. I also wanted to bring in some rhubarb--it's such a lovely seasonal fruit, and a big favorite of the husband. So I went browsing for some sort of cake/bread recipe and ended up on a buckle coffeecake... I adapted it to suit my whims of the day, and it was quite yummy. Still is. Might need to dish some of that up with my morning coffee...

When I was in catering mode, this baked eggs dish was one that I could pull out very easily for a crowd--a hotel pan of this goodness would feed between 25-30 people. The pharma reps would send me in to a number of different local medical establishments, and when they'd see me pull up with the eggs, the nurses would come running. I never really had the heart to tell them what is in it... this is one of those special occasion dishes! Your jeans will thank me if you don't make this every weekend.
Baked eggs to die for
Feeds 8
Mix together:
10 eggs
1 16 oz. container cottage cheese
2 cups grated cheddar cheese, mild
Mix together:
1/4 cup butter, melted
1/3 cup flour
1 tsp. baking powder
Now mix them all together. Pour into a 9-inch glass pie pan, or equivalent baking dish. Bake in a 375 degree oven for 30-40 minutes, until puffed and golden, and try not to eat it all in one sitting. This will be difficult.
Rhubarb buckle coffeecake
Adapted from Whole Grain Baking by King Arthur Flour Co.
Preheat oven to 375 degrees and non-stick spray a 9-inch baking dish
Streusel:
1/3 cup brown sugar
1/3 cup whole wheat flour
1/3 cup oats
1 tsp cinnamon
3 T unsalted butter, softened
Mix together all ingredients except butter. Cut butter in and mix to make medium-size crumbs.
Set aside.
Buckle:
2.5 cups whole wheat flour
2 tsp. baking powder
1/2 tsp. salt
4 T. unsalted butter
1 cup sugar
2 large eggs
1/2 cup milk
1 tsp. vanilla
5 cups rhubarb, tossed with 3/4 cup sugar (This is the main deviation, as the original recipe called for 2 cups of fruit. That seemed to paltry to me, and I wanted to proportion of fruit to batter to be MORE in the fruit department.)
Cream together butter and sugar in a large mixing bowl until light and fluffy, then add the eggs, one at a time, stopping to scrape the sides and bottom of the bowl between additions. Stir in half the dry ingredients, then the milk and vanilla, scraping down the sides. Stir in the remaining dry ingredients, then gently fold in the rhubarb. Spread the batter in the prepared pan and sprinkle the streusel evenly over the top.
Bake the buckle until a cake tested inserted in the center comes out clean, 45-50 minutes. Remove from the oven and let it cool, in the pan, on a rack.
I was a bit worried when I had ALL the fruit folded in, that it would spill over the sides of the pan I used (an old quiche dish from Mom, about 12 inces across but only an inch deep), so I baked it over a cookie sheet to save my oven from yet another layer of baked who-knows-what. The good news is that it rose nicely but didn't spill over. You can't see the pretty pink rhubarb in this picture, but it was quite yummy and the whole grains didn't ruin the sweet-baked-goods aspect of it, either!
When I was in catering mode, this baked eggs dish was one that I could pull out very easily for a crowd--a hotel pan of this goodness would feed between 25-30 people. The pharma reps would send me in to a number of different local medical establishments, and when they'd see me pull up with the eggs, the nurses would come running. I never really had the heart to tell them what is in it... this is one of those special occasion dishes! Your jeans will thank me if you don't make this every weekend.
Baked eggs to die for
Feeds 8
Mix together:
10 eggs
1 16 oz. container cottage cheese
2 cups grated cheddar cheese, mild
Mix together:
1/4 cup butter, melted
1/3 cup flour
1 tsp. baking powder
Now mix them all together. Pour into a 9-inch glass pie pan, or equivalent baking dish. Bake in a 375 degree oven for 30-40 minutes, until puffed and golden, and try not to eat it all in one sitting. This will be difficult.
Adapted from Whole Grain Baking by King Arthur Flour Co.
Preheat oven to 375 degrees and non-stick spray a 9-inch baking dish
Streusel:
1/3 cup brown sugar
1/3 cup whole wheat flour
1/3 cup oats
1 tsp cinnamon
3 T unsalted butter, softened
Mix together all ingredients except butter. Cut butter in and mix to make medium-size crumbs.
Set aside.
Buckle:
2.5 cups whole wheat flour
2 tsp. baking powder
1/2 tsp. salt
4 T. unsalted butter
1 cup sugar
2 large eggs
1/2 cup milk
1 tsp. vanilla
5 cups rhubarb, tossed with 3/4 cup sugar (This is the main deviation, as the original recipe called for 2 cups of fruit. That seemed to paltry to me, and I wanted to proportion of fruit to batter to be MORE in the fruit department.)
Cream together butter and sugar in a large mixing bowl until light and fluffy, then add the eggs, one at a time, stopping to scrape the sides and bottom of the bowl between additions. Stir in half the dry ingredients, then the milk and vanilla, scraping down the sides. Stir in the remaining dry ingredients, then gently fold in the rhubarb. Spread the batter in the prepared pan and sprinkle the streusel evenly over the top.
Bake the buckle until a cake tested inserted in the center comes out clean, 45-50 minutes. Remove from the oven and let it cool, in the pan, on a rack.
I was a bit worried when I had ALL the fruit folded in, that it would spill over the sides of the pan I used (an old quiche dish from Mom, about 12 inces across but only an inch deep), so I baked it over a cookie sheet to save my oven from yet another layer of baked who-knows-what. The good news is that it rose nicely but didn't spill over. You can't see the pretty pink rhubarb in this picture, but it was quite yummy and the whole grains didn't ruin the sweet-baked-goods aspect of it, either!
Sunday, November 2, 2008
For goodness sake!
How else would you finish that headline than with "I love my hippie hippie shake?" Time for a little (blue)berry love.
This shake/smoothie is so great, it's like breakfast nirvana. If I've missed it in the morning for some nutty thing like an early appointment, I've made it for lunch, or dinner. I have even fallen asleep at night thinking, "Oh goodie, in the morning I'll get my yummy shake." That's addiction, folks. Also, a tad pathetic.
Here's how it happens, daily. In our house we make it to serve two. It gets whizzed up in a Vita Mixer; if you have a regular blender, you'll definitely want to halve it (as I've listed the portions below), unless the smell of a small appliance motor overheating adds an extra-special dash of joy to your morning...
Start with the apple (1, cored, not peeled) and half a banana (peeled, duh!).
Add OJ (1.5 cups) and start the whizzing.
Have your flax seed ground and ready to go (2 T.). You can buy it ground, or do that deed yourself. The benefits of the omega-3s are best with the seeds ground; whole flaxseeds are not absorbed with the same efficacy. Just saying.
I add the wheat germ (2 T) and oat bran (1/3 cup) and the aforementioned flax seed one at a time to the blender while it's going. Depending on your blender strength, you may want to stop, add, then put the lid on and keep going--it's a lot to add at once. I have had a couple of oopsie moments with the blender sending smoothie all the way to the ceiling! Lids are good.
Next, add the frozen blueberries (1.5 cups) (or mixed berries--we've alternated depending on the Costco price, and right now the mixed are somehow back to being more expensive) and the soy milk (1/2-1 cup, depending on your desired consistency) and turn the blender on high. It might take a bit of poking around (carefully) to get the berries pulled down into the rest of the mixture, but once you get it started it should blend well.

My basic approximations put this gem at a little over 600 calories, which, granted, is a hefty breakfast. But, it also has about 24.5 grams of fiber, which meets females-my-size daily nutritional fiber needs. So the rest of the day I can eat cheese and Twinkies... or not.
This shake/smoothie is so great, it's like breakfast nirvana. If I've missed it in the morning for some nutty thing like an early appointment, I've made it for lunch, or dinner. I have even fallen asleep at night thinking, "Oh goodie, in the morning I'll get my yummy shake." That's addiction, folks. Also, a tad pathetic.
Here's how it happens, daily. In our house we make it to serve two. It gets whizzed up in a Vita Mixer; if you have a regular blender, you'll definitely want to halve it (as I've listed the portions below), unless the smell of a small appliance motor overheating adds an extra-special dash of joy to your morning...
Start with the apple (1, cored, not peeled) and half a banana (peeled, duh!).
Add OJ (1.5 cups) and start the whizzing.
Have your flax seed ground and ready to go (2 T.). You can buy it ground, or do that deed yourself. The benefits of the omega-3s are best with the seeds ground; whole flaxseeds are not absorbed with the same efficacy. Just saying.
I add the wheat germ (2 T) and oat bran (1/3 cup) and the aforementioned flax seed one at a time to the blender while it's going. Depending on your blender strength, you may want to stop, add, then put the lid on and keep going--it's a lot to add at once. I have had a couple of oopsie moments with the blender sending smoothie all the way to the ceiling! Lids are good.
Next, add the frozen blueberries (1.5 cups) (or mixed berries--we've alternated depending on the Costco price, and right now the mixed are somehow back to being more expensive) and the soy milk (1/2-1 cup, depending on your desired consistency) and turn the blender on high. It might take a bit of poking around (carefully) to get the berries pulled down into the rest of the mixture, but once you get it started it should blend well.
My basic approximations put this gem at a little over 600 calories, which, granted, is a hefty breakfast. But, it also has about 24.5 grams of fiber, which meets females-my-size daily nutritional fiber needs. So the rest of the day I can eat cheese and Twinkies... or not.
Total credit for this recipe goes to the husband, who tweaked and fiddled with the ingredients for about a year before he talked me into trying it. Instant convert! If I haven't persuaded you here, just come visit. I have been known to "batch" this to feed more than two; shakes for everyone!
Labels:
blueberries,
breakfast,
health,
recipes